How to configure Windows Live Mail 2009?
1. From your 'Start' menu, select 'Windows Live Mail' - you might find this in 'All Programs' then 'Windows Live', Windows Live Mail will open.
If this is the first time you set up Windows Live Mail, the 'Add e-mail account' screen will open - move on to the next step
If not, click 'Add e-mail account'

2. Enter your E-mail settings
Fill in the blanks as below:
- Email Address: Your full email addresse.g. sample@sample.com
- Password: enter your email login password
- Select 'Remember password'
- Display Name: Your name, as you wish it to appear on the messages you send
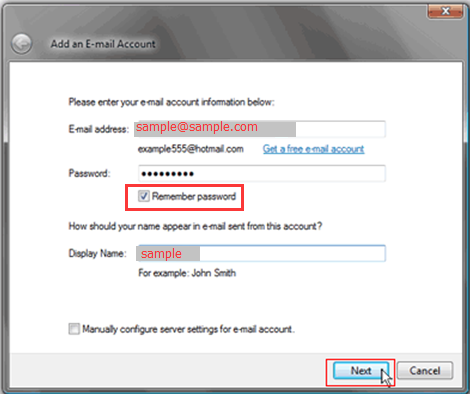
Click 'Next'
3. Fill in the blanks as below:
- Incoming mail server: Select POP3
- Incoming server: pop.chengmail.cn
- Port: 110
- This server requires a secure connection: Do not select the checkbox
- Login ID: Your account name that you chose when registering, e.g. sample@sample.com
- Outgoing server: smtp.chengmail.cn
- Port: 25
- This server requires a secure connection: Do not select the checkbox
- My outgoing server requires authentication: select the checkbox
Click 'Next':

4. Click 'Finish', you will be able to send and receive E-mails using Windows Live Mail now.
*Some Internet Service Provider (ISP) may block the SMTP port 25 and this will cause your windows live mail setting not working (you will not be able to send out emails by using windows live mail).
To solve this, at step 3 mentioned above, do the following changes:
- Incoming mail server: Select POP3
- Incoming server: pop.chengmail.cn
- Port: 995
- This server requires a secure connection: select the checkbox
- Logon using: Clear text authentication
- Login ID : Your complete email address, e.g. sample@sample.com
- Outgoing server: smtp.chengmail.cn
- Port: 465
- This server requires a secure connection: select the checkbox
- My outgoing server requires authentication: select the checkbox
Click 'Next':